An Unfortunate Task
This year I had the unfortunate task of making a cremation urn for my father. He was a survivor of more than twelve years from his cancer diagnosis. There were a lot of good years in that time but in the end we could see things closing in and the call was not unexpected.
When my mother picked us up at the airport we were not even out to the car yet before she asked me about making a cremation urn. I had already been thinking about it so it only made sense to say yes. This was a bit of a challenge for me though. I had never made a cremation urn before or even been very interested in making large hollow forms. While we were still in Ottawa I began researching . I ordered Turning Hollow Forms: Techniques and Projects and read through that. Then I researched different hollowing systems and searched out images of urns on Google to get ideas .
Wood for the Urn
While I was researching the techniques and tools to be used I also started thinking about what wood to use. In my parents backyard I found a couple of sections from large branches of trees that had been cut down in recent years.
The first section was from a large maple that was their street tree for all the years that they lived in the house. My father used to track the growth of this tree and to this day there is still a chart of its growth in one of the sheds. It had been cut down a year earlier after the street side of the tree died off. The other section of wood was from a large butternut tree in the backyard. My parents had planted this tree many years ago. I remember when we were growing up there was always a clothesline tied between this tree and one of the other trees in the yard and we played many a game of badminton with the clothesline as the net. I was able to cut two suitable blanks from each section and shipped those home to work with.
Getting Knowledgeable Advise
By the time I got home I was thoroughly confused by the number of different hollowing systems available. There were also some specific considerations about urns that I had questions about. I made contact with Larry Stevenson, who I knew through the Greater Vancouver Woodturners Guild. We don’t know each other well but he was kind enough to invite me over to his shop. We went through some of the different tool options for hollowing. He also showed me some examples of the urns that he makes and discussed some of the considerations that I would need to account for.
Larry is a big advocate of using your head to solve problems rather than just throwing money at them. While we did discuss some of the hollowing systems available for purchase he also showed me some of the tools that he has made for himself. In the end I wound up borrowing a spare set of tools he had made that would work for the first stages of the hollowing and ideas for how to make my own tool for the deeper sections. The tool I made for deep hollowing basically consists of a length of 3/4″ tool steel set into a long handle. The other end of the steel rod has a hole drilled into the end for a high speed steel cutter held in place by a grub screw. Cheap and simple to make but really quite effective.


Hollowing Practice
With tools, wood and advise in place it was time to for some practice. Deep hollowing and thread chasing were two skills that I felt I needed to work on before trying to make the actual urn. I started with a couple of hollow forms using some wood that just happened to be on hand.
The first piece was going well until I messed up the opening. Since it was a practice piece I decided to cut it in half to see how uniform I had managed to get the wall thickness. Overall I was pretty happy with what I found.


Taking that experience I tried another piece that was a bit larger. The shape turned out to be not very good but it served the purpose of practising some deep hollowing.

Thread Chasing Practice
The other skill I needed was chasing threads. I had considered getting some brass insert threads for the purpose. After doing some research though I decided they were too expensive and would put constraints on the design. I purchased the Sorby 16 tpi thread chasing tools and started practising. Normally thread chasing is done with very hard, close grained woods such as boxwood and ebony. I wanted to try using softer woods though and decided to experiment with maple that had been stabilized with resin to make it harder. It was not really that difficult to do but definitely need a bit of practise to get the feel. My first successful threads were in a box so small that maybe(?) you could fit a coin inside.


After that I began making a series of small boxes. In addition to being good practice for thread chasing they have turned out to make good birthday presents for a few people.


Roughing out the Urns
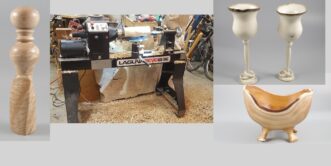
Once I was satisfied that I had a enough practice I began working with the wood from my parents property. Since I was working with green wood I decided to rough out an urn from each of the four blanks that I had cut. That way I would be able to go with the one that dried the best later on. Incidentally this was about the time that I upgraded to a new lathe. This was one of the first pieces that I turned on it.


We were aiming to have the internment on his birthday so that gave me about three months to let the roughed out blanks dry before I had to choose one and get it finished. As it turned out it was the butternut pieces, on the left side in the picture, that dried the best. That tree had been cut down longer and it seems to have been drier to start with as a result. I had initially been concerned about the condition of the wood but while the sapwood was quite punky the heartwood turned out to be in great condition. Once it was dried we selected the butternut blank with the shape we liked best.
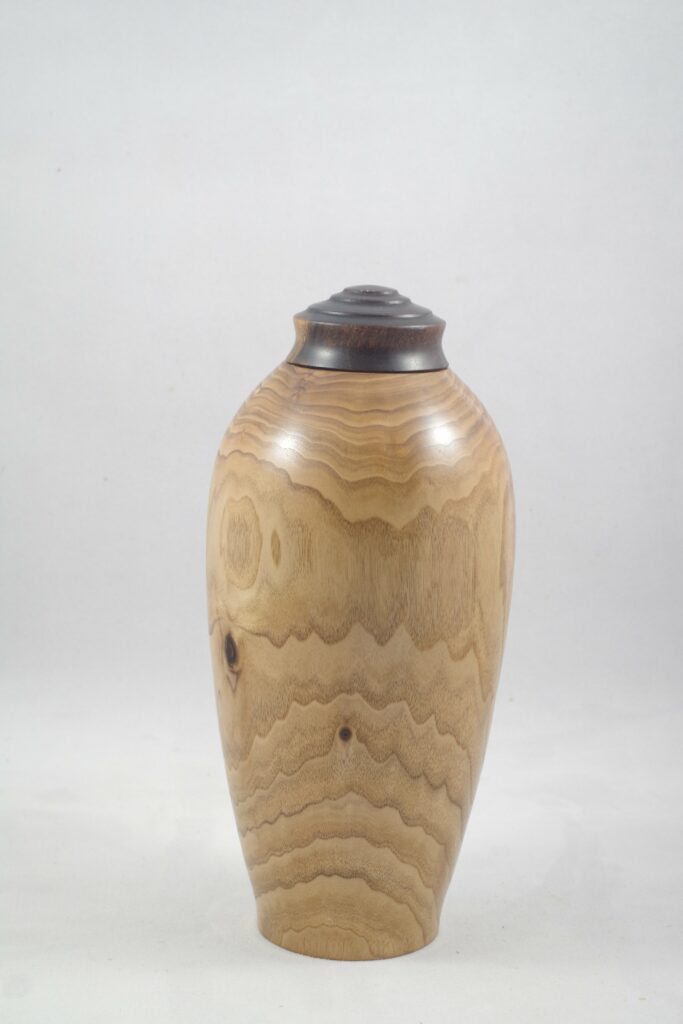
Finishing the Urn
I put the roughed out urn we had chosen back on the lathe and trued up the outside. Then I finished hollowing out the inside the final depth and wall thickness. For the top I chose a piece of walnut that I had on hand. I stained the top with a mixture of steel wool and vinegar to get a nice contrast with the urn.


In the end I finished it on time and I am pleased with the end product. I still have the three left over rough outs but for now I think they will stay unfinished. At the moment I have no desire to either finish or dispose of them. Hiding them away somewhere and forgetting about them for a while seems like a good plan. A number of people have suggested that I could sell cremation urns for a good price but I would rather not for now. Perhaps a referral to Larry Stevenson is a good thank you for his assistance. He really does do wonderful work.
I’m attempting to do my first urn. I notice you use a blank that is essentially in log form meaning you hollow into the end of the log. How do you avoid the pith of the log? Is it a factor at all?
Hi David, the pith was a concern but I had to work with it in order to use that wood. I had other wood on hand as backup in case it did not work. I have had good success with leaving the pith in while making goblets so I knew that it was possible. Basically I roughed it out to remove the bulk of the wood. This relieved some of the stress and gave it room to move. Then I sealed the end grain to slow the moisture loss there and set it aside to dry for a while. I can’t remember now what I used but think it would either have been log end sealer or ca glue. It did work out in the end but if I could choose I would try to start with a log big enough that I could avoid the pith altogether and just cut around it. Good luck with your urn!